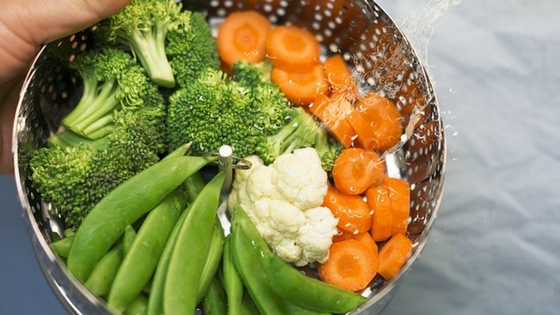
 Blanching your veg is vital if you are going to successfully freeze them. It helps preserve them better, keeps in the nutrients and stop them going limp.
Although the process of how to blanch vegetables before freezing is really simple and fairly quick to do you need to know how to blanch your vegetables before you freeze them and how long each type takes to get the best results.
Boing them is the quickest and easiest and most successful method to use. Here we cover the basics of blanching from boiling them to cooking them then getting them in that freezer. There is also a list of blanching times you can use.
You don’t really need any special equipment although a blanching pan will help.
Why Blanch Vegetables?
When I first started growing vegetables I wanted to grow enough to use over a longer period so I decided to get a freezer and to freeze them. I asked other gardeners on the allotment what they did. Many said they didn’t freeze as their veg came out soggy and limp. Nearly always they had not blanched. And although this added process takes time and effort the produce is then good for about a year in a good freezer.
So this is why you should blanch your vegetable when you intend to freeze them. You get better results and crisper veg. There is better retention of their original colour. And you keep more nutrients. It also destroys and surface bacteria.
What Equipment Do You Need?
- A Hob
- A large saucepan for blanching
- Blanching basket
- A Colander for draining
- Chopping board and knife
- Another large saucepan or container for cold water
- Flexible flat trays for freezing
You Also Need
- Vegetables
- Boiling Water
- Ice (optional)
- Salt (optional)

16cm x 14cm Tinned Blanching Basket
How to Blanch and Freeze Your Vegetables
When I blanch vegetables I tend to have a lot of one sort and as I have lots at any one time and they have different times I would not generally mix them.
The best way to blanch vegetables for freezing is to use boiling water on the hob. For most things, it is basically the same just the timings are slightly different. However, some things have a longer shelf life so may not need to be frozen. Some things are not as successful with freezing anyway so it might not be worth doing those. It is a personal choice.
- Prepare your vegetables by washing and cleaning them and topping and tailing them. Once you have cut off the ends you can choose to blanch now. I prefer to slice up my beans so I can see that they are OK inside (I grow virtually organically so am more prone to pests than sprayed things). It’s up to you.
- Blanch in boiling water for the allotted time (see our chart). If you want to use salt you can, I don’t and have never had any problems however some say that also helps maintain the colour of your vegetables.
- Remove from the pan and plunge into icy cold water or place under cold running water until they are cold. This stops the vegetables from cooking further.
- Drain and shake off the excess water.
- Pat dry or leave to drain.
- If it is small veg like peas or beans or other cut up vegetables spread out on a tray. Ideally, you want a flexible tray as it will be easier to remove your vegetables from them once they are frozen.
- Place your tray in the freezer and allow your vegetables to freeze. (If you put them all together they will freeze into a group rather than individually).
- Once they have frozen you can place them in a suitable container or bag.
Tip: When cutting your vegetables make sure you cut them about the same size so they blanch evenly.
How Long Should You Blanch For?
Blanching itself doesn’t take long. However, the timing is vital or the blanching to work well.
The table shows all the blanching times. Although for me personally some have a good storage time so I might just keep them and use them as needed.
[table caption=”Vegetable Blanching Times” width=”500″ colwidth=”20|100|100|100″ colalign=”left|left|center|left|right”]
no,Vegetable,Blanching Time
1, Globe Artichoke, 7-10 minutes
2, Asparagus, 3 minutes
3, Aubergines, 4 minutes
4, French beans, 2 minutes
5, Borlotti Beans, 2.5 minutes
6, Broad beans, 3 minutes
7, runner beans, 2-3 minutes
8, Beetroot, 3 minutes
9, Broccoli, 4 minutes
10, Brussel Sprouts, 3 minutes
11, Cabbage, 3 minutes
12, Carrots,3 minutes
13, Cauliflower, 3 minutes
14, Celeriac, 3 minutes
15, Kohlrabi While, 3 minutes
16, Kohlrabi diced, 1 minute
17, Marrows, 2 minutes
18, Leeks, 2 minutes
19, Peas – Green, 90 seconds
20, Peas – in the Pod, 90 seconds
21, Peppers – sweet, not necessary to blanch
22, Potatoes – Irish (New) 3-5
23, Rutabagas, 3 minutes
24, Soybeans – Green, 5 minutes
25, spinach, 2 minutes
26, Squash – Summer 3 minutes
27, Turnips, 3 minutes
[/table]
Why Blanching Your Veg in a Microwave Might not Work so Well
While you can blanch in the microwave one of the reasons you blanch is to stop any enzymes from working. Becuase cooking in the microwave is different this may not work if you blanch in this way.